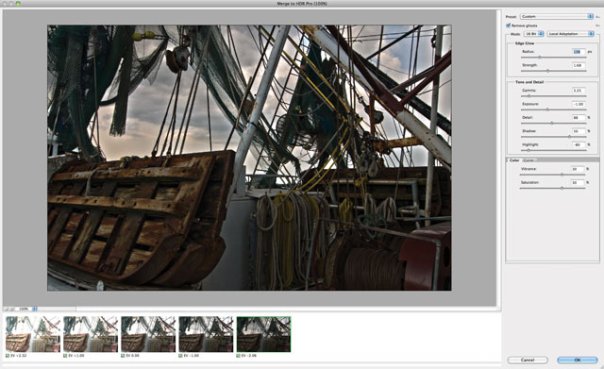
It’s Possible to do HDR Using Just Photoshop CS5
With Photoshop CS2, Adobe introduced the ability to merge multiple exposures to reate technically accurate 32-bit images. This process was far more scientific than it was creative. The goal here was to take multiple exposures of a subject (shot from a locked tripod or camera mount) and merge them into a new image that better displays highlights and shadows. You also gained the ability to have much greater control over areas like exposure and gamma.
If you’ve used Merge to HDR in earlier versions of Photoshop, it was a fairly underwhelming experience. Sure it worked, but it had no creative mojo. Fortunately Adobe has a long habit of actually listening to their critics. Thus was born Merge to HDR Pro with Photoshop CS5. Merge to HDR Pro got a major overhaul for stylistic purposes, and it can now create tone-mapped images that display a wider range of exposure than a traditional photo.
Here’s how to create an HDR image with Photoshop CS5.
1. Choose File > Automate > Merge to HDR Pro.
2. Within the Merge to HDR dialog box, click Browse to navigate to the source images. In the folder, Shift-click the images to select the ones you need. Check the box to Attempt to Automatically Align Source Images then click OK.

3. After a short time, a second Merge to HDR dialog box opens. You’ll see thumbnails for each of the images used as well as a resulting image.
4. From the Preset list choose Photorealistic High Contrast to get a punchier image.

The Image on the left exhibits ghosting caused by slight movement between exposures. Checking the Remove ghosts box compensates for variables like wind.
5. Click the Remove ghosts box to remove the trailing image details caused by wind blowing items in the scene

6. Adjust the exposure and contrast to taste:
For this image, the settings used were Exposure: -1.0 | Shadow: 50% | Highlight -80%
7. Try boosting the Saturation around 30% for richer colors.
8. Click OK to create a new HDR image.

Photo ©2010 Richard Harrington
_____
Posted on May 16, 2011, in HDR and tagged HDR, Photoshop. Bookmark the permalink. 8 Comments.

I’m still torn on if I like HDR processed images or not. I am certainly not a fan of the highly processed images I see everywhere, but I do like images that have taken advantage of the greater exposure range HDR offers, and yet unless looking carefully, you would not know it is an HDR shot.
Thanks Peter – although this is a how-to post – not a poll on whether or not folks like HDR. We’re going to limit future comments on this thread to comments about the actual post. We’ll post a poll on HDR later this month.
To each their own. There’s what I like and what clients like… not always the same thing.
Thanks for the post. Can’t wait to give it a try.
If you don’t has CS5, the demo version on Adobe’s website works for 30 day.
I like Photomatix for HDR. easy to get good results and a lot cheaper than Photoshop
You get what you pay for.
Photomatix shifts hues as it ramps through the luminosity values (unlike Photoshop). There’s other reasons why PS CS5 is worth the money.
One shown in this tut is very useful. CS5 is better with severe ghosting.
Take RAW photos into Photoshop. It considers much more than what you might think into the algorithm. CS5 produces a commercial quality product.